《Netty4核心原理与手写RPC框架实战》 简介
《Netty 4核心原理与手写RPC框架实战》首先从硬件层面深入分析网络通信原理,结合Java对网络I/O的API实现,将理论与实践串联起来,帮助大家透彻理解网络通信的起源,然后介绍Netty产生的背景并基于Netty手写Tomcat和RPC框架,帮助大家初步了解Netty的作用,接着分析Netty的核心原理和核心组件,基于Netty手写一个消息推送系统并进行性能调优,最后介绍设计模式在Netty中的应用和经典的面试题分析。
Java的IO演进之路 什么是IO? 我们都知道在UNIX世界里一切皆文件,而文件是什么呢?文件就是一串二进制流而已,其实不管是Socket,还是FIFO(First InputFirst Output,先进先出队列))、管道、终端。对计算机来说,一切都是文件,一切都是流。在信息交换的过程中,计算机都是对这些流进行数据的收发操作,简称为I/O操作(Input and Output)。
IO交互的流程 通常用户进程中的一次完整I/O交互流程分为两阶段,首先是经过内核空间,也就是由操作系统处理;紧接着就是到用户空间,也就是交由应用程序。
五种IO通信模型 在网络环境下,通俗地讲,将I/O分为两步:第一步是等待;第二步是数据搬迁。
如果想要提高I/O效率,需要将等待时间降低。因此发展出来五种I/O模型,分别是:阻塞I/O模型、非阻塞I/O模型、多路复用I/O模型、信号驱动I/O模型、异步I/O模型。其中,前四种被称为同步I/O。
如何区分呢? 首先一个I/O操作其实分成了两个步骤:发起IO请求 和实际的IO操作 。
同步I/O和异步I/O的 区别就在于第二个步骤是否阻塞,如果实际的I/O读写阻塞请求进程,那么就是同步I/O,因此阻塞I/O、 非阻塞I/O、I/O复用、信号驱动I/O都是同步I/O,如果不阻塞,而是操作系统帮你做完I/O操作再将结果 返回给你,那么就是异步I/O。
阻塞I/O和非阻塞I/O的区别在于第一步,发起I/O请求是否会被阻塞,如果阻塞直到完成那么就是传统的 阻塞I/O,如果不阻塞,那么就是非阻塞I/O。
阻塞I/O模型
非阻塞I/O模型
当用户进程发出read操作时,如果内核中的数据还没有准备好,那么它并不会阻塞用户进程,而是立刻返回一个error。从用户进程角度讲,它发起一个read操作后,并不需要等待,而是马上就得到了一个结果,用户进程判断结果是一个error时,它就知道数据还没有准备好。于是它可以再次发送read操作,一旦内核中的数据准备好了,并且再次收到了用户进程的系统调用,那么它会马上将数据拷贝到用户内存,然后返回,非阻塞型接口相比于阻塞型接口的显著差异在于,在被调用之后立即返回。
多路复用I/O模型
多个进程的I/O可以注册到一个复用器(Selector)上,当用户进程调用该Selector , Selector 会监听注册进来的所有I/O , 如果Selector监听的所有I/O在内核缓冲区都没有可读数据,select调用进程会被阻塞,而当任一I/O在内核缓冲区中有可读数据时,select调用就会返回,而后select调用进程可以自己或通知另外的进程(注册进程)再次发起读取I/O,读取内核中准备好的数据,多个进程注册I/O后,只有一个select调用进程被阻塞。
多路复用IO不一定比使用多线程+阻塞IO的模式更优,甚至性能更差,多路复用的优势在于可以处理更多的连接,而不是对单个连接处理更快
信号驱动IO模型
信号驱动I/O是指进程预先告知内核,向内核注册一个信号处理函数,然后用户进程返回不阻塞,当内核数据就绪时会发送一个信号给进程,用户进程便在信号处理函数中调用I/O读取数据。从上图可以看出,实际上I/O内核拷贝到用户进程的过程还是阻塞的,信号驱动I/O并没有实现真正的异步,因为通知到进程之后,依然由进程来完成I/O操作。这和后面的异步I/O模型很容易混淆,需要理解I/O交互并结合五种I/O模型进行比较阅读。
异步IO模型
异步I/O的工作机制是:告知内核启动某个操作,并让内核在整个操作完成后通知我们,这种模型与信号驱动I/O模型的区别在于,信号驱动I/O模型是由内核通知我们何时可以启动一个I/O操作,这个I/O操作由用户自定义的信号函数来实现,而异步I/O模型由内核告知我们I/O操作何时完成。
五种模型的对比
IO 概念区分(知乎) 四个相关概念:
同步(Synchronous)
异步( Asynchronous)
阻塞( Blocking )
非阻塞( Nonblocking)
同步/异步
同步/异步关注的是消息通信机制 (synchronous communication/ asynchronous communication) 。
所谓同步,就是在发出一个调用时,在没有得到结果之前, 该调用就不返回。
异步则是相反,调用在发出之后,这个调用就直接返回了,所以没有返回结果
阻塞/非阻塞
阻塞/非阻塞关注的是程序在等待调用结果(消息,返回值)时的状态.
阻塞调用是指调用结果返回之前,当前线程会被挂起。调用线程只有在得到结果之后才会返回。
非阻塞调用指在不能立刻得到结果之前,该调用不会阻塞当前线程。
BIO,NIO,AIO 有什么区别? 简答
BIO:Block IO 同步阻塞式 IO,就是我们平常使用的传统 IO,它的特点是模式简单使用方便,并 发处理能力低。
NIO:Non IO 同步非阻塞 IO,是传统 IO 的升级,客户端和服务器端通过 Channel(通道)通讯,实现了多路复用。
AIO:Asynchronous IO 是 NIO 的升级,也叫 NIO2,实现了异步非堵塞 IO ,异步 IO 的操作基于事件和回调机制。
详细回答
BIO (Blocking I/O): 同步阻塞I/O模式,数据的读取写入必须阻塞在一个线程内等待其完成。在活动 连接数不是特别高(小于单机1000)的情况下,这种模型是比较不错的,可以让每一个连接专注于 自己的 I/O 并且编程模型简单,也不用过多考虑系统的过载、限流等问题。线程池本身就是一个天然的漏斗,可以缓冲一些系统处理不了的连接或请求。但是,当面对十万甚至百万级连接的时候, 传统的 BIO 模型是无能为力的。因此,我们需要一种更高效的 I/O 处理模型来应对更高的并发量。
NIO (New I/O): NIO是一种同步非阻塞的I/O模型,在Java 1.4 中引入了NIO框架,对应 java.nio 包,提供了 Channel , Selector,Buffer等抽象。NIO中的 N可以理解为Non-blocking,不单纯是 New。它支持面向缓冲的,基于通道的I/O操作方法。 NIO提供了与传统BIO模型中的 Socket 和 ServerSocket 相对应的 SocketChannel 和 ServerSocketChannel 两种不同的套接字通道实现,两 种通道都支持阻塞和非阻塞两种模式。阻塞模式使用就像传统中的支持一样,比较简单,但是性能 和可靠性都不好;非阻塞模式正好与之相反。对于低负载、低并发的应用程序,可以使用同步阻塞 I/O来提升开发速率和更好的维护性;对于高负载、高并发的(网络)应用,应使用 NIO 的非阻塞 模式来开发
AIO (Asynchronous I/O): AIO 也就是 NIO 2。在 Java 7 中引入了 NIO 的改进版 NIO 2,它是异步非 阻塞的IO模型。异步 IO 是基于事件和回调机制实现的,也就是应用操作之后会直接返回,不会堵 塞在那里,当后台处理完成,操作系统会通知相应的线程进行后续的操作。AIO 是异步IO的缩写, 虽然 NIO 在网络操作中,提供了非阻塞的方法,但是 NIO 的 IO 行为还是同步的。对于 NIO 来 说,我们的业务线程是在 IO 操作准备好时,得到通知,接着就由这个线程自行进行 IO 操作,IO操 作本身是同步的。查阅网上相关资料,我发现就目前来说 AIO 的应用还不是很广泛,Netty 之前也 尝试使用过 AIO,不过又放弃了。
NIO介绍 缓冲区(Buffer) 在谈到缓冲区时,我们说缓冲区对象本质上是一个数组,但它其实是一个特殊的数组,缓冲区对象内置了一些机制,能够跟踪和记录缓冲区的状态变化情况 ,如果我们使用get()方法从缓冲区获取数据或者使用put()方法把数据写入缓冲区,都会引起缓冲区状态的变化。
缓冲区重要的属性:
position:指定下一个将要被写入或者读取的元素索引,它的值由get()/put()方法自动更新,在新创建一个Buffer对象时,position被初始化为0
limit:指定还有多少数据需要取出(在从缓冲区写入通道时),或者还有多少空间可以放入数据(在从通道读入缓冲区时)
capacity:指定了可以存储在缓冲区中的最大数据容量,实际上,它指定了底层数组的大小,或者至少是指定了准许我们使用的底层数组的容量
注:0<=position<=limit<=capacity
选择器(Selector) NIO中非阻塞I/O采用了基于Reactor模式的工作方式,I/O调用不会被阻塞,而是注册感兴趣的特定I/O事件,如可读数据到达、新的套接字连接等,在发生特定事件时,系统再通知我们。NIO中实现非阻塞I/O的核心对象是Selector,Selector是注册各种I/O事件的地方,而且当那些事件发生时,就是Seleetor告诉我们所发生的事件
通道(Channel) 通道是一个对象,通过它可以读取和写入数据,当然所有数据都通过Buffer对象来处理。我们永远不会将字节直接写入通道,而是将数据写入包含一个或者多个字节的缓冲区。同样也不会直接从通道中读取字节,而是将数据从通道读入缓冲区,再从缓冲区获取这个字节
Netty高性能之道 传统RPC调用性能差的三个原因 1.网络传输方式存在弊端 传统的RPC框架或者基于RMI等方式的远程服务(过程)调用都是采用BIO,当客户端的并发压力或网络时延增大的时候,BIO会因频繁的“wait”导致I/O线程经常出现阻塞的情况,由于线程本身无法高效地工作,I/O处理能力自然就会下降。这样的架构设计,最大的问题就是无法进行弹性伸缩。当用户访问量剧增时,并发量自然上升,而服务端的线程个数和并发访问数成线性正比。由于线程是JVM非常宝贵的系统资源,所以随着并发量的持续增加、线程数急剧膨胀,系统的性能也急剧下降,可能会发生句柄溢出和线程堆栈溢出等问题,最终可能会导致服务器宕机。
2.序列化方式存在弊端 Java自带的序列化方式存在如下缺点:
无法跨语言
比起其他第三方框架,占用空间太大
占用CPU资源太高,序列化性能差
3.线程模型存在弊端 由于传统的RPC框架均采用BIO模型,这使得每个TCP连接都需要分配1个线程,而线程资源是JVM非常宝贵的资源,当I/O读写阻塞导致线程无法及时释放时,会导致系统性能急剧下降,甚至会导致虚拟机无法创建新的线程
1.异步非阻塞通信 服务端的通信步骤:
客户端的通信步骤:
通过上面的序列图, 我们大概能够了解到Netty 的I/O 线程NioEventLoop聚合了Selector,可以同时并发处理成百上千个客户端Channel,而且它的读写操作都是非阻塞的,这可以大幅提升I/O线程的运行效率,避免由于频繁I/O阻塞导致的线程挂起。另外,由于Netty采用的是异步通信模式,单个I/O线程也可以并发处理多个客户端连接和读写操作,所以从根本上解决了传统BIO的单连接单线程模型的弊端,使整个系统的性能、弹性伸缩性能和可靠性都得到了极大的提升
2.零拷贝 在操作系统层面上的零拷贝是指避免在用户态与内核态之间来回拷贝数据的技术。Netty中的零拷贝与操作系统层面上的零拷贝不完全一样, Netty的零拷贝完全是在用户态(Java层面)的,更多是数据操作的优化。
Netty的接收和发送ByteBuffer使用直接内存进行Socket读写,不需要进行字节缓冲区的二次拷贝。如果使用JVM的堆内存进行Socket读写,JVM会将堆内存Buffer拷贝一份到直接内存中,然后才写入Socket中。相比于使用直接内存,消息在发送过程中多了一次缓冲区的内存拷贝。
Netty的文件传输调用FileRegion包装的transferTo方法,可以直接将文件缓冲区的数据发送到目标Channel,避免通过循环write方式导致的内存拷贝问题。
Netty提供CompositeByteBuf类, 可以将多个ByteBuf合并为一个逻辑上的ByteBuf, 避免了各个ByteBuf之间的拷贝。
通过wrap操作, 我们可以将byte[]数组、ByteBuf、ByteBuffer等包装成一个Netty ByteBuf对象, 进而避免拷贝操作。
ByteBuf支持slice操作,可以将ByteBuf分解为多个共享同一个存储区域的ByteBuf, 避免内存的拷贝。
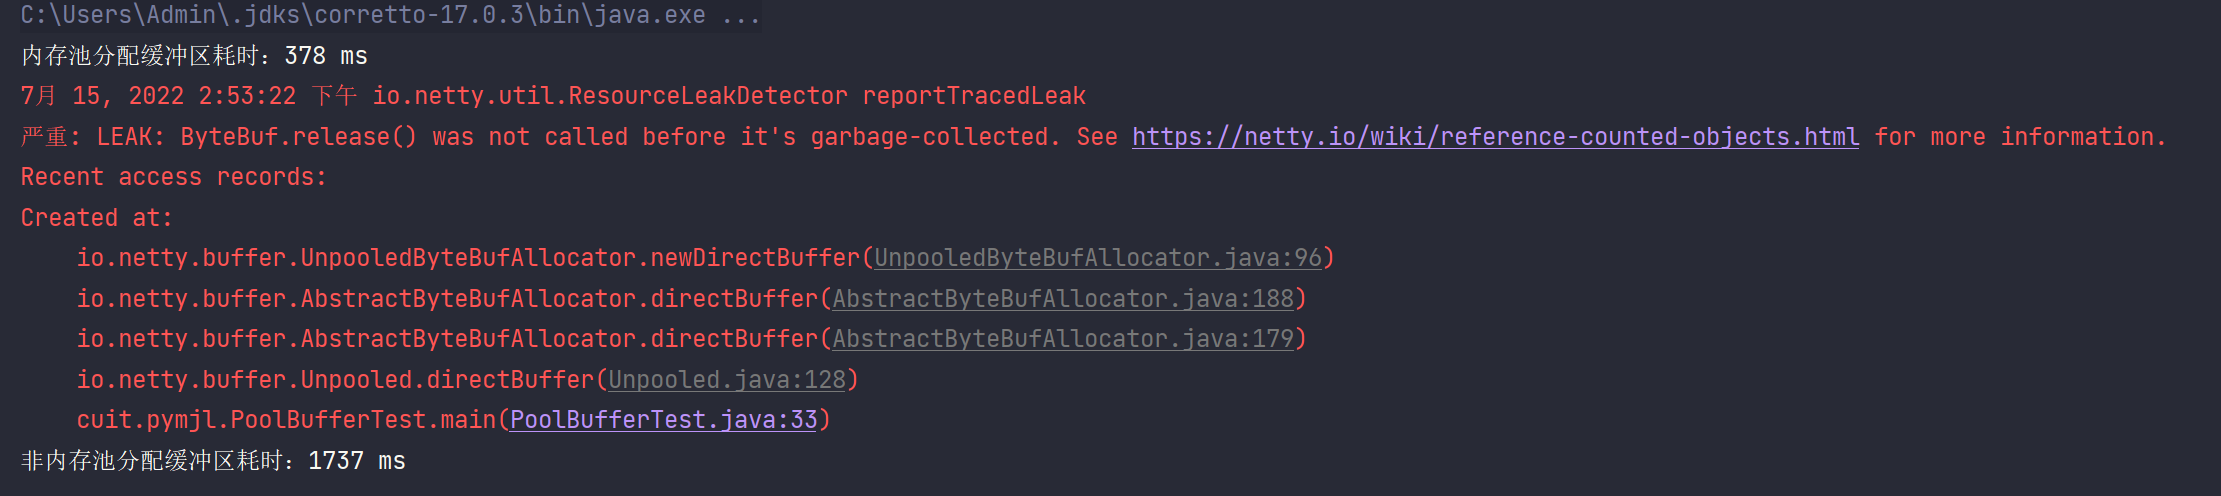
3.池化技术 为了尽量重复利用缓冲区内存,Netty设计了一套基于内存池的缓冲区重用机制。
1
2
3
4
5
6
7
8
9
10
11
12
13
14
15
16
17
18
19
20
21
22
23
24
25
26
27
28
29
30
31
32
33
34
35
36
37
38
39
package cuit.pymjl;import io.netty.buffer.ByteBuf;import io.netty.buffer.PooledByteBufAllocator;import io.netty.buffer.Unpooled;import java.nio.ByteBuffer;public class PoolBufferTest {private static final int BUFFER_SIZE = 1024 ;private static final int COUNT = 1800000 ;private static final byte [] bytes = new byte [BUFFER_SIZE];public static void main (String[] args) {long start = System.currentTimeMillis();ByteBuf poolBuffer = null ;for (int i = 0 ; i < COUNT; i++) {long end = System.currentTimeMillis();"内存池分配缓冲区耗时:" + (end - start) + " ms" );ByteBuf buffer = null ;for (int i = 0 ; i < COUNT; i++) {"非内存池分配缓冲区耗时:" + (end - start) + " ms" );
异常信息我们暂时不用处理,可以看到内存池分配耗时显著的比不用内存池要快得多
4.高效的Reactor模型 一般地,I/O多路复用机制都依赖于一个**事件多路分离器(Event Demultiplexer)**。分离器对象可将来自事件源的I/O事件分离出来,并分发到对应的read/write事件处理器(Event Handler)。开发人员预先注册需要处理的事件及其事件处理器(或回调函数;事件分离器负责将请求事件传递给事件处理器。
两个与事件分离器有关的模式是Reactor 和Proactor 。Reactor模式采用同步I/O,而Proactor采用异步 I/O 。在Reactor中,事件分离器负责等待文件描述符或socket为读写操作准备就绪,然后将就绪事件传 递给对应的处理器,最后由处理器负责完成实际的读写工作。 而在Proactor模式中,处理器或者兼任处理器的事件分离器,只负责发起异步读写操作。I/O操作本身由 操作系统来完成。传递给操作系统的参数需要包括用户定义的数据缓冲区地址和数据大小,操作系统才 能从中得到写出操作所需数据,或写入从socket读到的数据。事件分离器捕获I/O操作完成事件,然后将 事件传递给对应处理器。比如,在windows上,处理器发起一个异步I/O操作,再由事件分离器等待 IOCompletion事件。典型的异步模式实现,都建立在操作系统支持异步API的基础之上,我们将这种实 现称为“系统级”异步或“真”异步,因为应用程序完全依赖操作系统执行真正的I/O工作。
在Reactor中实现读:
注册读就绪事件和相应的事件处理器;
事件分离器等待事件;
事件到来,激活分离器,分离器调用事件对应的处理器;
事件处理器完成实际的读操作,处理读到的数据,注册新的事件,然后返还控制权。
在Proactor中实现读:
处理器发起异步读操作(注意:操作系统必须支持异步I/O)。在这种情况下,处理器无视I/O就绪 事件,它关注的是完成事件;
事件分离器等待操作完成事件;
在分离器等待过程中,操作系统利用并行的内核线程执行实际的读操作,并将结果数据存入用户自 定义缓冲区,最后通知事件分离器读操作完成;
事件分离器呼唤处理器;
事件处理器处理用户自定义缓冲区中的数据,然后启动一个新的异步操作,并将控制权返回事件分 离器。
可以看出,两个模式的相同点,都是对某个I/O事件的事件通知(即告诉某个模块,这个I/O操作可以进 行或已经完成)。在结构上,两者的相同点和不同点如下:
相同点:demultiplexor负责提交I/O操作(异步)、查询设备是否可操作(同步),然后当条件满 足时,就回调handler;
不同点:异步情况下(Proactor),当回调handler时,表示I/O操作已经完成;同步情况下 (Reactor),回调handler时,表示I/O设备可以进行某个操作(can read or can write)。
Reactor单线程模型 这是最简单的单Reactor单线程模型。Reactor线程负责多路分离套接字、accept新连接,并分派请求到 处理器链中。该模型适用于处理器链中业务处理组件能快速完成的场景。不过,这种单线程模型不能充 分利用多核资源,所以实际使用的不多。
这个模型和上面的NIO流程很类似,只是将消息相关处理独立到了Handler中去了。
1
2
3
4
5
6
7
8
9
10
11
12
13
14
15
16
17
18
19
20
21
22
23
24
25
26
27
28
29
30
31
32
33
34
35
36
37
38
39
40
41
42
43
44
45
46
47
48
49
50
51
52
53
54
55
56
57
58
59
60
61
62
63
64
65
66
67
68
69
70
71
72
73
74
75
76
77
78
79
80
81
82
83
84
85
86
87
88
89
90
91
92
93
94
95
96
97
98
99
100
101
102
103
104
105
106
107
108
109
110
111
112
113
114
115
116
117
118
119
120
121
122
123
124
125
126
127
128
129
130
131
132
133
134
135
136
137
138
139
140
141
142
143
144
145
146
147
148
149
150
151
152
153
154
155
156
157
158
159
160
161
162
163
164
165
166
167
168
169
170
171
172
173
174
175
package ReactorOne;import java.io.IOException;import java.net.InetSocketAddress;import java.nio.ByteBuffer;import java.nio.channels.SelectionKey;import java.nio.channels.Selector;import java.nio.channels.ServerSocketChannel;import java.nio.channels.SocketChannel;import java.util.Set;public class Reactor implements Runnable {final Selector selector;final ServerSocketChannel serverSocketChannel;public Reactor (Selector selector, ServerSocketChannel serverSocketChannel) {this .selector = selector;this .serverSocketChannel = serverSocketChannel;public Reactor (int port) throws IOException {new InetSocketAddress (port));false );final SelectionKey key = serverSocketChannel.register(selector, SelectionKey.OP_ACCEPT);new Acceptor ());@Override public void run () {while (!Thread.interrupted()) {try {final Set<SelectionKey> selectionKeys = selector.selectedKeys();for (SelectionKey selectionKey : selectionKeys) {catch (IOException e) {throw new RuntimeException (e);private void dispatch (SelectionKey selectionKey) {Runnable run = (Runnable) selectionKey.attachment();if (run != null ) {public static void main (String[] args) throws IOException {new Thread (new Reactor (1234 )).start();class Acceptor implements Runnable {@Override public void run () {try {final SocketChannel channel = serverSocketChannel.accept();if (channel != null ) {new Handler (selector, channel);catch (IOException e) {throw new RuntimeException (e);class Handler implements Runnable {private final static int DEFAULT_SIZE = 1024 ;private final SocketChannel socketChannel;private final SelectionKey selectionKey;public static final int READING = 0 ;public static final int SENDING = 1 ;private int state = READING;ByteBuffer inputBuffer = ByteBuffer.allocate(DEFAULT_SIZE);ByteBuffer outputBuffer = ByteBuffer.allocate(DEFAULT_SIZE);throws IOException {this .socketChannel = socketChannel;false );this .selectionKey = socketChannel.register(selector, 0 );this );@Override public void run () {if (state == READING) {new Sender ().read();else if (state == SENDING) {new Sender ().write();class Sender implements Runnable {@Override public void run () {try {catch (IOException e) {if (outIsComplete()) {private void write () {try {catch (IOException e) {while (outIsComplete()) {private void read () {try {if (inputIsComplete()) {"接收到来自客户端(" +")的消息:" + new String (inputBuffer.array()));new Sender ());catch (IOException e) {public boolean inputIsComplete () {return true ;public boolean outIsComplete () {return true ;public void process () {
Reactor多线程模型 相比上一种模型,该模型在处理器链部分采用了多线程(线程池):
Reactor多线程模型就是将Handler中的IO操作和非IO操作分开,操作IO的线程称为IO线程,非IO操作的 线程称为工作线程。这样的话,客户端的请求会直接被丢到线程池中,客户端发送请求就不会堵塞。
1
2
3
4
5
6
7
8
9
10
11
12
13
14
15
16
17
18
19
20
21
22
23
24
25
26
27
28
29
30
31
32
33
34
35
36
37
38
39
40
41
42
43
44
45
46
47
48
49
50
51
52
53
54
55
56
57
58
59
60
61
62
63
64
65
66
67
68
69
70
71
72
73
74
75
76
77
78
79
80
81
82
83
84
85
86
87
88
89
90
91
92
93
94
95
96
97
98
99
100
101
102
103
104
105
106
107
108
109
110
111
112
113
114
115
116
117
118
119
120
121
122
123
124
125
126
127
128
129
130
131
132
133
134
135
136
137
138
139
140
141
142
143
144
145
146
147
148
149
150
151
152
153
154
155
156
157
158
159
160
161
162
163
164
165
166
167
168
169
170
171
172
173
174
175
176
177
178
179
180
181
182
183
184
185
186
187
188
189
190
191
192
193
194
195
196
197
198
199
package ReactorMore;import java.io.IOException;import java.net.InetSocketAddress;import java.nio.ByteBuffer;import java.nio.channels.SelectionKey;import java.nio.channels.Selector;import java.nio.channels.ServerSocketChannel;import java.nio.channels.SocketChannel;import java.util.Set;import java.util.concurrent.ExecutorService;import java.util.concurrent.Executors;public class Reactor implements Runnable {final Selector selector;final ServerSocketChannel serverSocketChannel;public Reactor (Selector selector, ServerSocketChannel serverSocketChannel) {this .selector = selector;this .serverSocketChannel = serverSocketChannel;public Reactor (int port) throws IOException {new InetSocketAddress (port));false );final SelectionKey key = serverSocketChannel.register(selector, SelectionKey.OP_ACCEPT);new Acceptor ());@Override public void run () {while (!Thread.interrupted()) {try {final Set<SelectionKey> selectionKeys = selector.selectedKeys();for (SelectionKey selectionKey : selectionKeys) {catch (IOException e) {throw new RuntimeException (e);private void dispatch (SelectionKey selectionKey) {Runnable run = (Runnable) selectionKey.attachment();if (run != null ) {public static void main (String[] args) throws IOException {new Thread (new Reactor (1234 )).start();class Acceptor implements Runnable {@Override public void run () {try {final SocketChannel channel = serverSocketChannel.accept();if (channel != null ) {new Handler (selector, channel);catch (IOException e) {throw new RuntimeException (e);class Handler implements Runnable {private final static int DEFAULT_SIZE = 1024 ;private final SocketChannel socketChannel;private final SelectionKey selectionKey;public static final int READING = 0 ;public static final int SENDING = 1 ;private int state = READING;ByteBuffer inputBuffer = ByteBuffer.allocate(DEFAULT_SIZE);ByteBuffer outputBuffer = ByteBuffer.allocate(DEFAULT_SIZE);private Selector selector;private static ExecutorService executorService = private static final int PROCESSING = 3 ;throws IOException {this .socketChannel = socketChannel;false );this .selector = selector;this .selectionKey = socketChannel.register(selector, 0 );this );@Override public void run () {if (state == READING) {new Sender ().read();else if (state == SENDING) {new Sender ().write();class Sender implements Runnable {@Override public void run () {try {catch (IOException e) {if (outIsComplete()) {private void write () {try {catch (IOException e) {while (outIsComplete()) {private void read () {try {if (inputIsComplete()) {"接收到来自客户端(" +")的消息:" + new String (inputBuffer.array()));new Sender ());catch (IOException e) {public boolean inputIsComplete () {return true ;public boolean outIsComplete () {return true ;public void process () {synchronized void processAndHandOff () {class Processer implements Runnable {public void run () {
主从Reactor多线程模型 主从Reactor多线程模型是将Reactor分成两部分,mainReactor负责监听server socket,accept新连 接,并将建立的socket分派给subReactor。subReactor负责多路分离已连接的socket,读写网络数据, 对业务处理功能,其扔给worker线程池完成。通常,subReactor个数上可与CPU个数等同:
1
2
3
4
5
6
7
8
9
10
11
12
13
14
15
16
17
18
19
20
21
22
23
24
25
26
27
28
29
30
31
32
33
34
35
36
37
38
39
40
41
42
43
44
45
46
47
48
49
50
51
52
53
54
55
56
57
58
59
60
61
62
63
64
65
66
67
68
69
70
71
72
73
74
75
76
77
78
79
80
81
82
83
84
85
86
87
88
89
90
91
92
93
94
95
96
97
98
99
100
101
102
103
104
105
106
107
108
109
110
111
112
113
114
115
116
117
118
119
120
121
122
123
124
125
126
127
128
129
130
131
132
133
134
135
136
137
138
139
140
141
142
143
144
145
146
147
148
149
150
151
152
153
154
155
156
157
158
159
160
161
162
163
164
165
166
167
168
169
170
171
172
173
174
175
176
177
178
179
180
181
182
183
184
185
186
187
188
189
190
191
192
193
194
195
196
197
198
199
200
201
package ReactorSub;import java.io.IOException;import java.net.InetSocketAddress;import java.nio.ByteBuffer;import java.nio.channels.SelectionKey;import java.nio.channels.Selector;import java.nio.channels.ServerSocketChannel;import java.nio.channels.SocketChannel;import java.util.Set;import java.util.concurrent.ExecutorService;import java.util.concurrent.Executors;import java.util.concurrent.atomic.AtomicInteger;public class Reactor {final ServerSocketChannel serverSocketChannel;AtomicInteger next = new AtomicInteger (0 );ExecutorService sunReactors = public static void main (String[] args) throws IOException {new Reactor (1234 );public Reactor (int port) throws IOException {new InetSocketAddress (port));false );new Selector [4 ];for (int i = 0 ; i < 4 ; i++) {Selector selector = Selector.open();SelectionKey key = serverSocketChannel.register(selector,new Acceptor ());new Thread (() -> {while (!Thread.interrupted()) {try {for (SelectionKey selectionKey : selectionKeys) {catch (IOException e) {private void dispatch (SelectionKey selectionKey) {Runnable run = (Runnable) selectionKey.attachment();if (run != null ) {class Acceptor implements Runnable {@Override public void run () {try {SocketChannel connection = serverSocketChannel.accept();if (connection != null ) {new Handler (selectors[next.getAndIncrement() % selectors.length], connection));catch (IOException e) {class Handler implements Runnable {private final static int DEFAULT_SIZE = 1024 ;private final SocketChannel socketChannel;private final SelectionKey selectionKey;public static final int READING = 0 ;public static final int SENDING = 1 ;private int state = READING;ByteBuffer inputBuffer = ByteBuffer.allocate(DEFAULT_SIZE);ByteBuffer outputBuffer = ByteBuffer.allocate(DEFAULT_SIZE);private Selector selector;private static ExecutorService executorService = private static final int PROCESSING = 3 ;throws IOException {this .socketChannel = socketChannel;false );this .selector = selector;this .selectionKey = socketChannel.register(selector, 0 );this );@Override public void run () {if (state == READING) {new Handler .Sender().read();else if (state == SENDING) {new Handler .Sender().write();class Sender implements Runnable {@Override public void run () {try {catch (IOException e) {if (outIsComplete()) {private void write () {try {catch (IOException e) {while (outIsComplete()) {private void read () {try {if (inputIsComplete()) {"接收到来自客户端(" +")的消息:" + new String (inputBuffer.array()));new Handler .Sender());catch (IOException e) {public boolean inputIsComplete () {return true ;public boolean outIsComplete () {return true ;public void process () {synchronized void processAndHandOff () {class Processer implements Runnable {public void run () {
主从就是有多个线程负责处理连接,多个线程处理网络IO
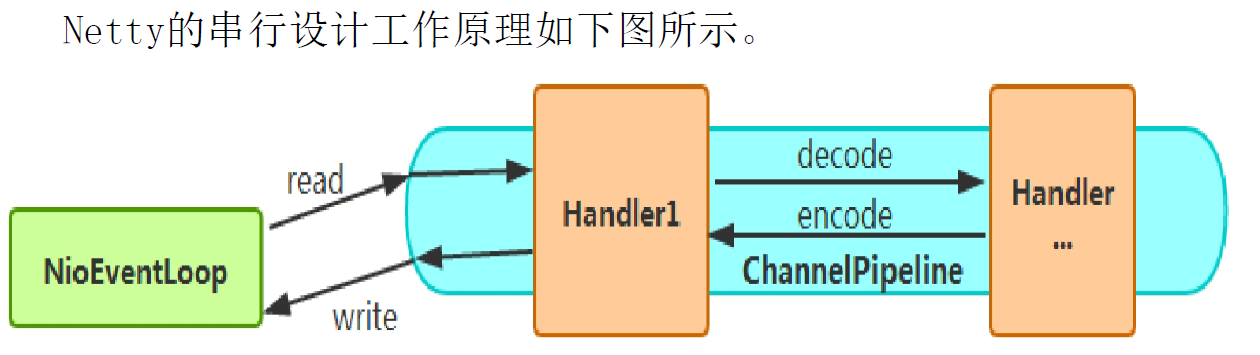
5.无锁化的串行设计理念 为了尽可能避免锁竞争带来的性能损耗,可以通过串行化设计来避免多线程竞争和同步锁,即消息的处理尽可能在同一个线程内完成,不进行线程切换 为了尽可能提升性能,Netty采用了无锁化串行设计,在I/O线程内部进行串行操作,避免多线程竞争导致的性能下降。 表面上看,似乎串行设计的CPU利用率不高,并发程度不够。但是,通过调整NIO线程池的线程参数,可以同时启动多个串行的线程并行运行,这种局部无锁化的串行线程设计相比一个队列-多个工作线程的模型性能更优
6.高效的并发编程 Netty的高效并发编程主要体现在如下几点:
volatile关键字的大量且正确的使用。
CAS和原子类的广泛使用。
线程安全容器的使用。
通过读写锁提升并发性能。
7.对高性能序列化框架的支持 Netty默认提供了对Google Protobuf的支持,用户也可以通过扩展Netty的编解码接口接入其他高性能的序列化框架进行编解码
8.灵活的TCP配置参数能力 合理设置TCP参数在某些场景下对性能的提升具有显著的效果,例如SO_RCVBUF和SO_SNDBUF。如果设置不当,对性能的影响也是非常大的。下面我们总结一下对性能影响比较大的几个配置项:
SO_RCVBUF和SO_SNDBUF:通常建议值为128KB或者256KB
SO_TCPNODELAY:Nagle算法通过将缓冲区内的小封包自动相连,组成较大的封包,阻止大量小封包的发送阻塞网络,从而提高网络应用效率。但是对于延时敏感的应用场景需要关闭该优化算法
Nagle算法是以其发明人John Nagle的名字命名的,它用于将小的碎片数据连接成更大的报文来最小化所发送的报文的数量。如果需要发送一些较小的报文,则需要禁用该算法。Netty默认禁用该算法,从而使报文传输延时最小化。
Bootstrap解析 客户端的Bootstrap 这是一个典型的客户端样例:
1
2
3
4
5
6
7
8
9
10
11
12
13
14
15
16
17
18
19
20
21
22
23
24
25
26
27
28
29
30
31
32
33
34
35
36
37
38
39
40
41
42
43
44
45
46
47
48
49
50
51
52
53
54
55
56
57
58
59
60
61
62
63
64
65
66
67
68
69
70
71
72
73
74
75
76
77
78
79
80
81
82
83
84
package cuit.pymjl.transport;import cuit.pymjl.handler.AbstractCustomHeartbeatHandler;import cuit.pymjl.handler.ClientHandler;import io.netty.bootstrap.Bootstrap;import io.netty.buffer.ByteBuf;import io.netty.channel.*;import io.netty.channel.nio.NioEventLoopGroup;import io.netty.channel.socket.SocketChannel;import io.netty.channel.socket.nio.NioSocketChannel;import io.netty.handler.codec.LengthFieldBasedFrameDecoder;import io.netty.handler.timeout.IdleStateHandler;import java.util.Random;import java.util.concurrent.TimeUnit;public class NettyClient {private NioEventLoopGroup workGroup = new NioEventLoopGroup ();private Channel channel;private Bootstrap bootstrap;private final String host;private final Integer port;public NettyClient (String host, int port) {this .host = host;this .port = port;public void start () {try {new Bootstrap ();new ChannelInitializer <SocketChannel>() {@Override protected void initChannel (SocketChannel socketChannel) throws Exception {ChannelPipeline p = socketChannel.pipeline();new IdleStateHandler (0 , 0 , 5 ));new LengthFieldBasedFrameDecoder (1024 , 0 , 4 , -4 , 0 ));new ClientHandler (NettyClient.this ));catch (Exception e) {throw new RuntimeException (e);public void doConnect () {if (channel != null && channel.isActive()) {return ;ChannelFuture future = bootstrap.connect(host, port);new ChannelFutureListener () {@Override public void operationComplete (ChannelFuture futureListener) throws Exception {if (futureListener.isSuccess()) {"Connect to server successfully!" );else {"Failed to connect to server, try connect after 10s" );new Runnable () {@Override public void run () {10 , TimeUnit.SECONDS);
NioSocketChannel的创建 在初始化Bootstrap中,该方法调用了一个channel()方法,传入的参数是NioSocketChannel.class,在这个方法中其实就是初始化了一个ReflectiveChannelFactory的对象
1
2
3
public B channel (Class<? extends C> channelClass) {return this .channelFactory((io.netty.channel.ChannelFactory)(new ReflectiveChannelFactory ((Class)ObjectUtil.checkNotNull(channelClass, "channelClass" ))));
而ReflectiveChannelFactory实现了ChannelFactory接口,它提供了唯一的方法,即newChannel()方法。顾名思义,ChannelFactory就是创建Channel 的工厂类。进入ReflectiveChannelFactory 的newChannel()方法,我们看其实现代码:
1
2
3
4
5
6
7
public T newChannel () {try {return (Channel)this .constructor.newInstance();catch (Throwable var2) {throw new ChannelException ("Unable to create Channel from class " + this .constructor.getDeclaringClass(), var2);
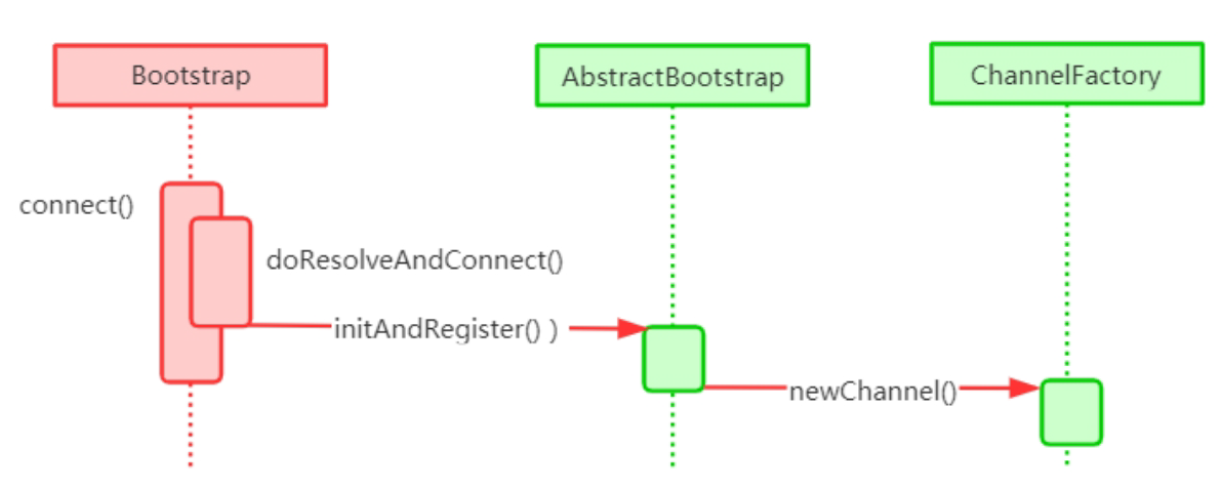
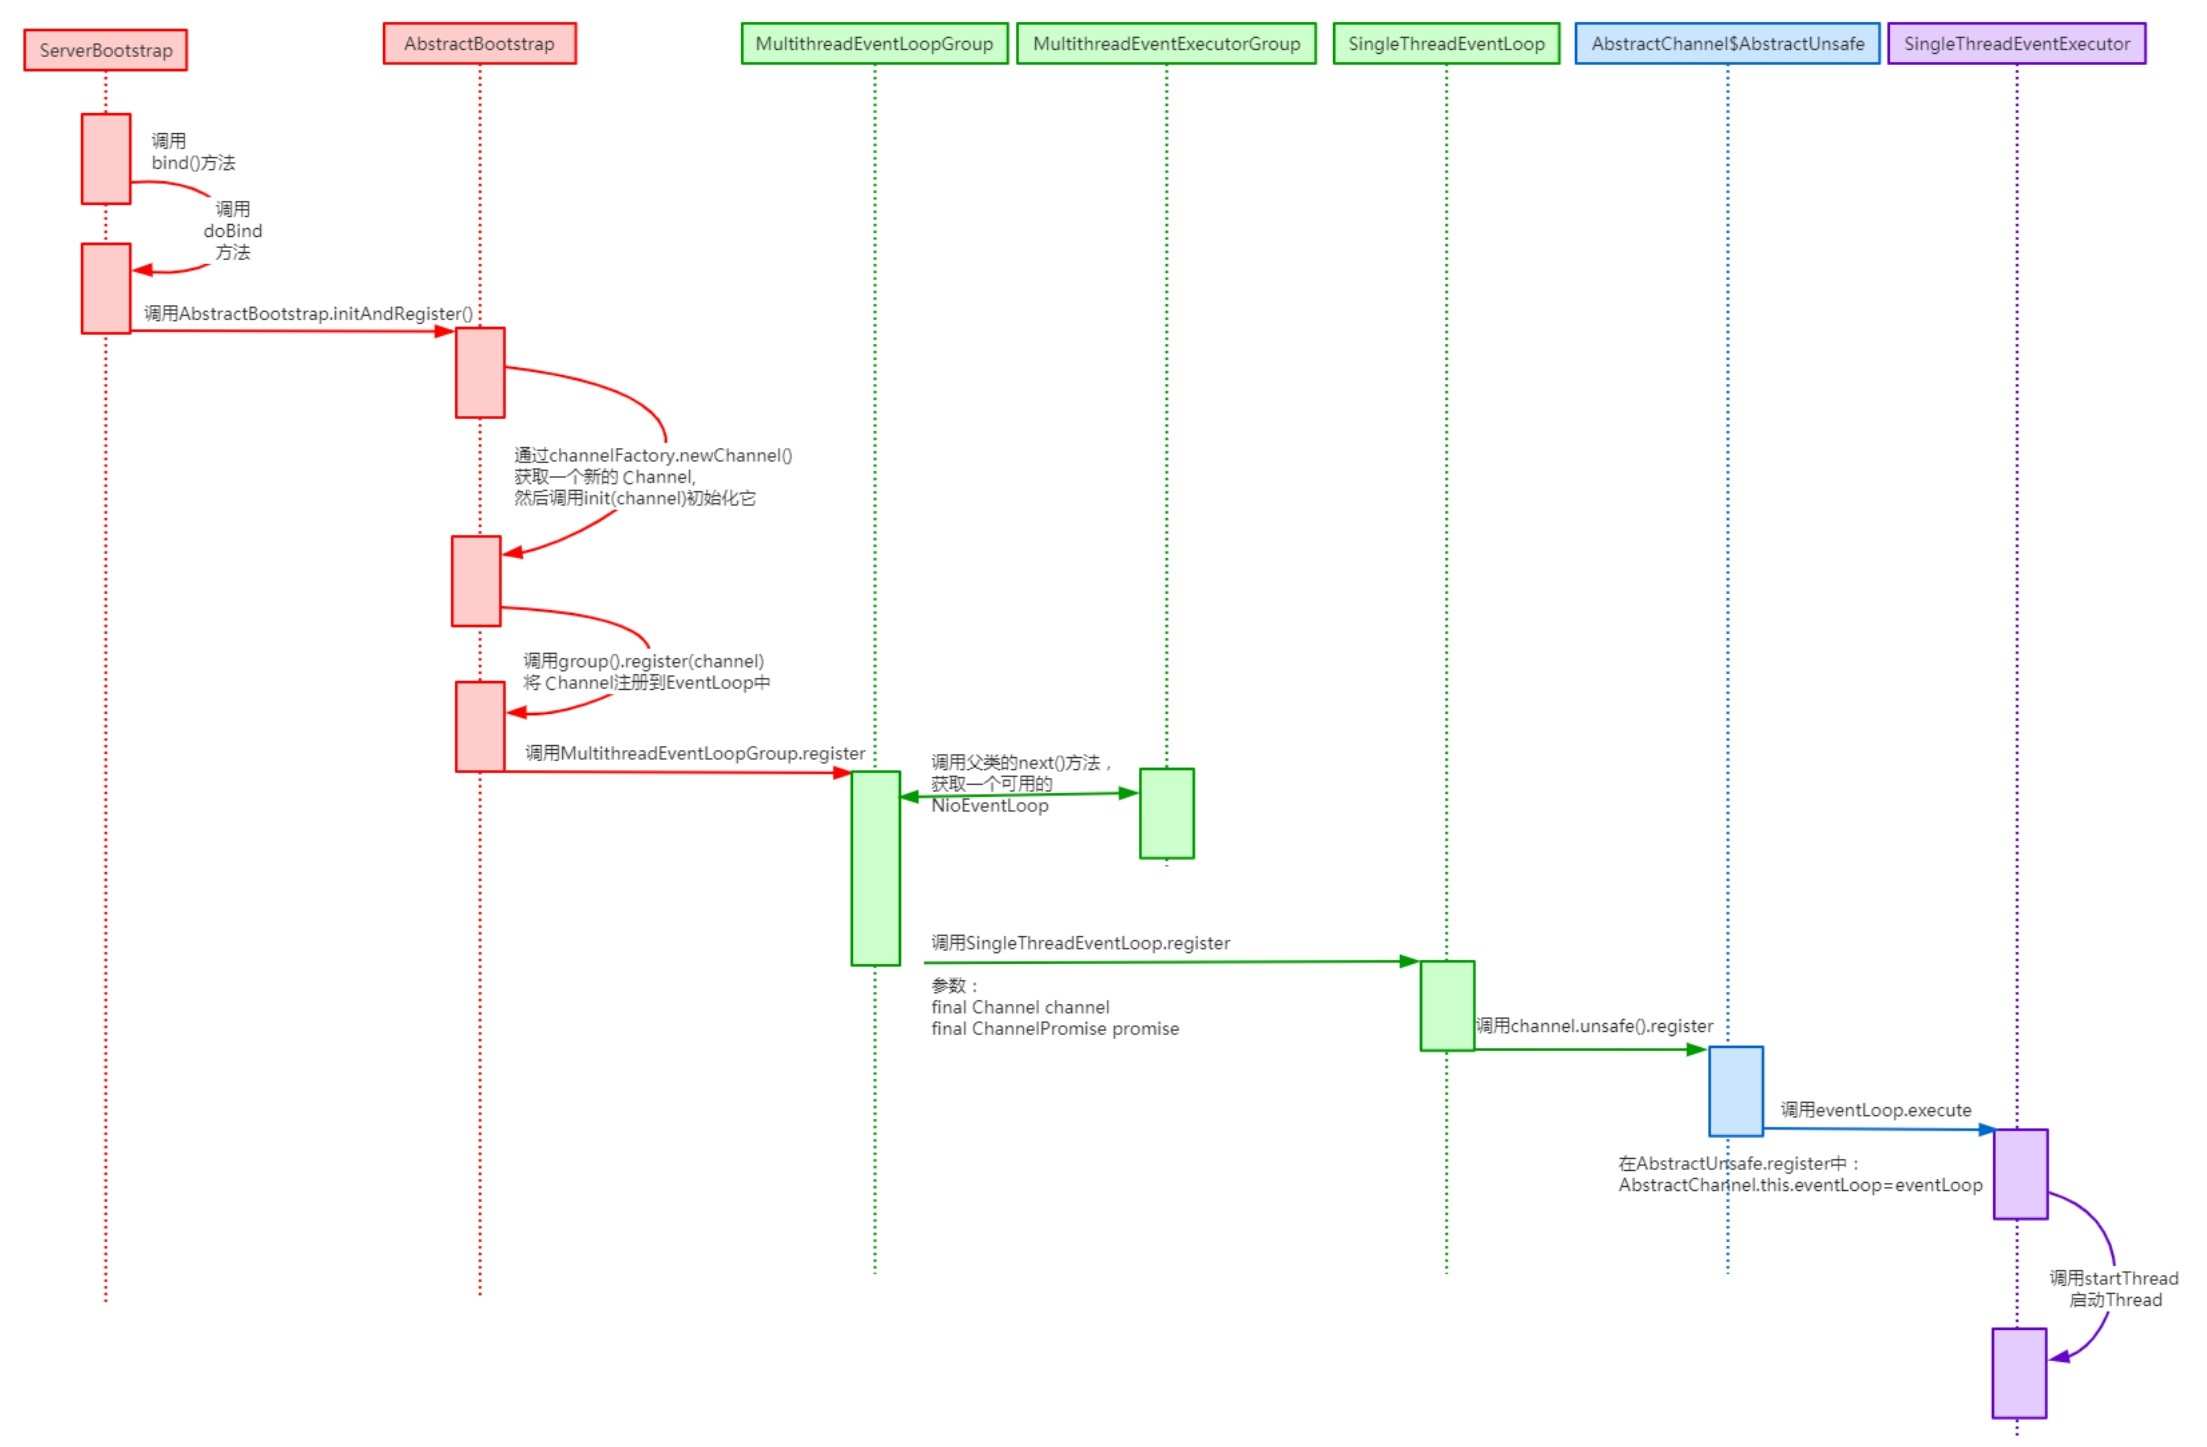
客户端Channel的初始化 在客户端调用bootstrap.connect()方法是调用newChannel()初始化NioSocketChannel实例,调用时序图如下:
在AbstractBootstrap 的initAndRegister() 方法中, 调用ChannelFactory的newChannel()方法来创建一个NioSocketChannel的实例,代码如下:
1
2
3
4
5
6
7
8
9
10
11
12
13
14
15
16
17
18
19
20
21
22
23
final ChannelFuture initAndRegister () {Channel channel = null ;try {this .channelFactory.newChannel();this .init(channel);catch (Throwable var3) {if (channel != null ) {return (new DefaultChannelPromise (channel, GlobalEventExecutor.INSTANCE)).setFailure(var3);return (new DefaultChannelPromise (new FailedChannel (), GlobalEventExecutor.INSTANCE)).setFailure(var3);ChannelFuture regFuture = this .config().group().register(channel);if (regFuture.cause() != null ) {if (channel.isRegistered()) {else {return regFuture;
而ChannelFactory是根据NioSocketChannel的默认构造来实例化对象:
1
2
3
4
5
6
7
8
9
10
11
12
13
14
15
16
17
18
19
20
21
22
23
24
25
26
27
28
29
30
31
32
33
34
35
36
37
38
39
40
41
42
43
44
45
46
47
48
49
50
51
52
53
54
55
56
57
private static final SelectorProvider DEFAULT_SELECTOR_PROVIDER = SelectorProvider.provider();public NioSocketChannel () {this (DEFAULT_SELECTOR_PROVIDER);public NioSocketChannel (SelectorProvider provider) {this (newSocket(provider));private static java.nio.channels.SocketChannel newSocket (SelectorProvider provider) {try {return provider.openSocketChannel();catch (IOException var2) {throw new ChannelException ("Failed to open a socket." , var2);public NioSocketChannel (java.nio.channels.SocketChannel socket) {this ((Channel)null , socket);public NioSocketChannel (Channel parent, java.nio.channels.SocketChannel socket) {super (parent, socket);this .config = new NioSocketChannel .NioSocketChannelConfig(this , socket.socket());protected AbstractNioByteChannel (Channel parent, SelectableChannel ch) {super (parent, ch, 1 );protected AbstractNioChannel (Channel parent, SelectableChannel ch, int readInterestOp) {super (parent);this .ch = ch;this .readInterestOp = readInterestOp;try {false );catch (IOException var7) {try {catch (IOException var6) {"Failed to close a partially initialized socket." , var6);throw new ChannelException ("Failed to enter non-blocking mode." , var7);protected AbstractChannel (Channel parent) {this .parent = parent;this .id = this .newId();this .unsafe = this .newUnsafe();this .pipeline = this .newChannelPipeline();
我们来总结一下NioSocketChannel初始化的过程:
调用NioSocketChannel.newSocket(DEFAULT_SELECTOR_PROVIDER)打开一个新的Java NioSocketChannel
初始化AbstractChannel(Channel parent)对象并给属性赋值,具体赋值的属性如下:
AbstractNIOChannel中被赋值的属性如下:
ch:被赋值为Java原生SocketChannel,即NioSocketChannel的newSocket()方法返回的Java NIO SocketChannel
readInterestOp:被赋值为 1
ch:被配置为非阻塞,即调用ch.configureBlocking(false)方法
Unsafe属性的初始化 在实例化NioSocketChannel的过程中,会在父类AbstractChannel的构造方法中调用newUnsafe()方法来获取一个Unsafe实例,Unsafe其实是对Java底层Socket操作的封装,因此,它实际上是沟通Netty上层和Java底层的重要桥梁。下面我们看一下Unsafe接口所提供的方法:
1
2
3
4
5
6
7
8
9
10
11
12
13
14
15
16
17
public interface Unsafe {recvBufAllocHandle () ;localAddress () ;remoteAddress () ;void register (EventLoop var1, ChannelPromise var2) ;void bind (SocketAddress var1, ChannelPromise var2) ;void connect (SocketAddress var1, SocketAddress var2, ChannelPromise var3) ;void disconnect (ChannelPromise var1) ;void close (ChannelPromise var1) ;void closeForcibly () ;void deregister (ChannelPromise var1) ;void beginRead () ;void write (Object var1, ChannelPromise var2) ;void flush () ;voidPromise () ;outboundBuffer () ;
从上述代码中可以看出,这些方法其实都是与Java底层的相关Socket的操作相对应的
1 2 3 4 protected AbstractNioUnsafe newUnsafe () {return new NioSocketChannel .NioSocketChannelUnsafe();
ChannelPipeline的初始化 我们知道, 在实例化一个Channel 时, 必然都要实例化一个ChannelPipeline。而我们确实在AbstractChannel的构造器中看到了Pipeline 属性被初始化为DefaultChannelPipeline 的实例:
1
2
3
4
5
6
7
8
9
10
11
protected DefaultChannelPipeline (Channel channel) {this .channel = (Channel)ObjectUtil.checkNotNull(channel, "channel" );this .succeededFuture = new SucceededChannelFuture (channel, (EventExecutor)null );this .voidPromise = new VoidChannelPromise (channel, true );this .tail = new DefaultChannelPipeline .TailContext(this );this .head = new DefaultChannelPipeline .HeadContext(this );this .head.next = this .tail;this .tail.prev = this .head;
DefaultChannelPipeline的构造器需要传入一个Channel,而这个Channel 其实就是我们实例化的NioSocketChannel 对象,DefaultChannelPipeline 会将这个NioSocketChannel 对象保存在Channel属性中。其实在DefaultChannelPipeline 中维护了一个以AbstractChannelHandlerContext为节点元素的双向链表,这个链表是Netty实现Pipeline机制的关键
NioEventLoop的初始化 NioEventLoop有几个重载的构造器,不过内容都没有太大的区别,最终都调用父类MultithreadEventLoopGroup的构造器,代码如下:
1 2 3 4 5 6 7 8 9 10 11 12 13 14 15 16 17 18 19 20 21 22 23 24 25 26 27 28 29 public NioEventLoopGroup () {this (0 );public NioEventLoopGroup (int nThreads) {this (nThreads, (Executor)null );public NioEventLoopGroup (int nThreads, Executor executor) {this (nThreads, executor, SelectorProvider.provider());public NioEventLoopGroup (int nThreads, Executor executor, SelectorProvider selectorProvider) {this (nThreads, executor, selectorProvider, DefaultSelectStrategyFactory.INSTANCE);public NioEventLoopGroup (int nThreads, Executor executor, SelectorProvider selectorProvider, SelectStrategyFactory selectStrategyFactory) {super (nThreads, executor, new Object []{selectorProvider, selectStrategyFactory, RejectedExecutionHandlers.reject()});protected MultithreadEventLoopGroup (int nThreads, Executor executor, Object... args) {super (nThreads == 0 ? DEFAULT_EVENT_LOOP_THREADS : nThreads, executor, args);private static final int DEFAULT_EVENT_LOOP_THREADS = Math.max(1 , SystemPropertyUtil.getInt("io.netty.eventLoopThreads" , NettyRuntime.availableProcessors() * 2 ));
MultithreadEventLoopGroup内部处理逻辑这里不再演示,下面我们来总结一下NioEventLoopGroup初始化过程:
EventLoopGroup ( 其实是MultithreadEventExecutorGroup ) 内部维护一个类型为EventExecutor的children数组,其大小是nThreads,这样就构成了一个线程池
我们在实例化NioEventLoopGroup时,如果指定线程池大小,则nThreads就是指定的值,反之是CPU核数×2。
在MultithreadEventExecutorGroup中调用newChild()方法来初始化children数组
newChild()方法是在NioEventLoopGroup中实现的,它返回一个NioEventLoop实例
初始化NioEventLoop对象并给属性赋值,具体赋值的属性如下:
provider : 就是在NioEventLoopGroup 构造器中, 调用SelectorProvider.provider()方法获取的SelectorProvider对象。
selector : 就是在NioEventLoop 构造器中, 调用provider.openSelector()方法获取的Selector对象
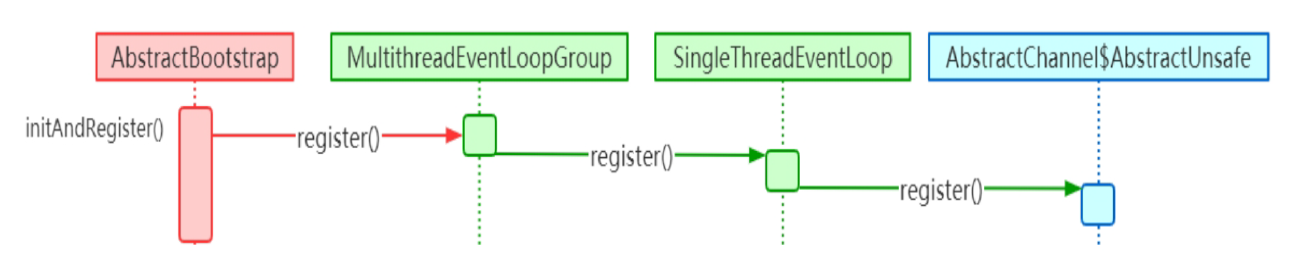
将Channel注册进Selector中 我们提到Channel会在Bootstrap 的initAndRegister()中进行初始化,但是这个方法还会将初始化好的Channe 注册到NioEventLoop 的Selector 中。接下来我们分析一下Channel注册的过程:
1
2
3
4
5
6
7
8
9
10
11
12
13
14
15
16
17
18
19
20
21
22
23
24
final ChannelFuture initAndRegister () {Channel channel = null ;try {this .channelFactory.newChannel();this .init(channel);catch (Throwable var3) {if (channel != null ) {return (new DefaultChannelPromise (channel, GlobalEventExecutor.INSTANCE)).setFailure(var3);return (new DefaultChannelPromise (new FailedChannel (), GlobalEventExecutor.INSTANCE)).setFailure(var3);ChannelFuture regFuture = this .config().group().register(channel);if (regFuture.cause() != null ) {if (channel.isRegistered()) {else {return regFuture;
注册的调用链路如下:
总的来说,Channel的注册过程所做的工作就是将Channel与对应的EventLoop进行关联。因此,在Netty中,每个Channel都会关联一个特定的EventLoop,并且这个Channel中的所有I/O操作都是在这个EventLoop中执行的;当关联好Channel和EventLoop后,会继续调用底层Java NIO的SocketChannel对象的register()方法,将底层Java NIO的SocketChannel注册到指定的Selector中。通过这两步,就完成了Netty对Channel的注册过程。
服务端的ServerSocketChannel 我们先来看看NettyServer的一个代码示例:
1
2
3
4
5
6
7
8
9
10
11
12
13
14
15
16
17
18
19
20
21
22
23
24
25
26
27
28
29
30
31
32
33
34
35
36
37
38
39
40
41
42
43
44
45
46
47
48
49
50
51
52
53
54
55
56
57
58
59
package cuit.pymjl.transport;import cuit.pymjl.handler.ServerHandler;import io.netty.bootstrap.ServerBootstrap;import io.netty.channel.Channel;import io.netty.channel.ChannelInitializer;import io.netty.channel.ChannelPipeline;import io.netty.channel.nio.NioEventLoopGroup;import io.netty.channel.socket.SocketChannel;import io.netty.channel.socket.nio.NioServerSocketChannel;import io.netty.handler.codec.LengthFieldBasedFrameDecoder;import io.netty.handler.timeout.IdleStateHandler;public class NettyServer {private final int port;public NettyServer (int port) {this .port = port;public void run () {NioEventLoopGroup bossGroup = new NioEventLoopGroup (1 );NioEventLoopGroup workGroup = new NioEventLoopGroup (4 );try {ServerBootstrap bootstrap = new ServerBootstrap ();new ChannelInitializer <SocketChannel>() {@Override protected void initChannel (SocketChannel socketChannel) throws Exception {ChannelPipeline p = socketChannel.pipeline();new IdleStateHandler (10 , 0 , 0 ));new LengthFieldBasedFrameDecoder (1024 , 0 , 4 , -4 , 0 ));new ServerHandler ());Channel ch = bootstrap.bind(port).sync().channel();"server start success, port: " + port);catch (Exception e) {throw new RuntimeException (e);finally {
服务端基本写法与客户端的代码相比,没有很大的差别,基本上也是进行如下几个部分的初始化:
EventLoopGroup:无论是服务端还是客户端,都必须指定EventLoopGroup。在上面的代码中,指定了NioEventLoopGroup,表示一个NIO 的EventLoopGroup , 不过服务端需要指定两个EventLoopGroup,一个是bossGroup,用于处理客户端的连接请求,另一个是workerGroup,用于处理与各个客户端连接的I/O操作。
指定Channel 的类型。这里是服务端, 所以使用了NioServerSocketChannel
配置自定义的业务处理器Handler
NioServerSocketChannel的创建 在客户端中, Channel 类型的指定是在初始化时通过Bootstrap的channel()方法设置的,服务端也是同样的方式。
服务端Channel的初始化 我们来看一下NioServerSocketChannel的默认构造器。与NioSocketChannel类似,构造器都是调用newSocket()方法来打开一个Java NIO Socket。不过需要注意的是,客户端的newSocket()方法调用的是openSocketChannel,而服务端的newSocket()方法调用的是openServerSocketChannel 。顾名思义, 一个是客户端的JavaSocketChannel,另一个是服务端的Java ServerSocketChannel,代码如下:
1
2
3
4
5
6
7
8
9
10
11
12
13
14
15
16
17
18
19
20
21
22
23
24
private static final SelectorProvider DEFAULT_SELECTOR_PROVIDER = SelectorProvider.provider();public NioServerSocketChannel () {this (newSocket(DEFAULT_SELECTOR_PROVIDER));public NioServerSocketChannel (SelectorProvider provider) {this (newSocket(provider));private static java.nio.channels.ServerSocketChannel newSocket (SelectorProvider provider) {try {return provider.openServerSocketChannel();catch (IOException var2) {throw new ChannelException ("Failed to open a server socket." , var2);public NioServerSocketChannel (java.nio.channels.ServerSocketChannel channel) {super ((Channel)null , channel, 16 );this .config = new NioServerSocketChannel .NioServerSocketChannelConfig(this , this .javaChannel().socket());
bossGroup与workerGroup bossGroup只用于服务端的accept,也就是用于处理客户端新连接接入的请求,而workGroup负责处理网络I/O的读写以及业务处理,bossGroup 与workerGroup的关系如下图所示:
首先,服务端的bossGroup不断地监听是否有客户端的连接,当发现有一个新的客户端连接到来时,bossGroup就会为此连接初始化各项资源。然后,从workerGroup中选出一个EventLoop绑定到此客户端连接中; 接下来,服务端与客户端的交互过程将全部在此分配的EventLoop中完成
1
2
3
4
5
6
7
8
9
10
11
12
13
14
15
16
17
18
19
20
21
22
23
24
25
26
ServerBootstrap bootstrap = new ServerBootstrap ();new ChannelInitializer <SocketChannel>() {@Override protected void initChannel (SocketChannel socketChannel) throws Exception {ChannelPipeline p = socketChannel.pipeline();new IdleStateHandler (10 , 0 , 0 ));new LengthFieldBasedFrameDecoder (1024 , 0 , 4 , -4 , 0 ));new ServerHandler ());public ServerBootstrap group (EventLoopGroup parentGroup, EventLoopGroup childGroup) {super .group(parentGroup);if (this .childGroup != null ) {throw new IllegalStateException ("childGroup set already" );else {this .childGroup = (EventLoopGroup)ObjectUtil.checkNotNull(childGroup, "childGroup" );return this ;
group()方法初始化了两个属性:parentGroup=bossGroup,childGroup=workGroup
1
2
3
4
5
6
7
8
9
10
11
12
13
14
15
16
17
18
19
20
21
22
23
24
25
26
27
28
29
30
31
32
33
34
35
36
public ChannelFuture bind (SocketAddress localAddress) {this .validate();return this .doBind((SocketAddress)ObjectUtil.checkNotNull(localAddress, "localAddress" ));private ChannelFuture doBind (final SocketAddress localAddress) {final ChannelFuture regFuture = this .initAndRegister();final ChannelFuture initAndRegister () {Channel channel = null ;try {this .channelFactory.newChannel();this .init(channel);catch (Throwable var3) {if (channel != null ) {return (new DefaultChannelPromise (channel, GlobalEventExecutor.INSTANCE)).setFailure(var3);return (new DefaultChannelPromise (new FailedChannel (), GlobalEventExecutor.INSTANCE)).setFailure(var3);ChannelFuture regFuture = this .config().group().register(channel);if (regFuture.cause() != null ) {if (channel.isRegistered()) {else {return regFuture;
继续看init(channel)方法:
1 2 3 4 5 6 7 8 9 10 11 12 13 14 15 16 17 18 19 20 21 22 23 24 25 26 27 void init (Channel channel) {this .newOptionsArray(), logger);this .newAttributesArray());ChannelPipeline p = channel.pipeline();final EventLoopGroup currentChildGroup = this .childGroup;final ChannelHandler currentChildHandler = this .childHandler;final Entry<ChannelOption<?>, Object>[] currentChildOptions = newOptionsArray(this .childOptions);final Entry<AttributeKey<?>, Object>[] currentChildAttrs = newAttributesArray(this .childAttrs);new ChannelHandler []{new ChannelInitializer <Channel>() {public void initChannel (final Channel ch) {final ChannelPipeline pipeline = ch.pipeline();ChannelHandler handler = ServerBootstrap.this .config.handler();if (handler != null ) {new ChannelHandler []{handler});new Runnable () {public void run () {new ChannelHandler []{new ServerBootstrap .ServerBootstrapAcceptor(ch, currentChildGroup, currentChildHandler, currentChildOptions, currentChildAttrs)});
ServerBootstrapAcceptor是ServerBootstrap中的一个内部类,它继承了ChannelInboundHandlerAdapter,然后重写了channelRead方法:
1
2
3
4
5
6
7
8
9
10
11
12
13
14
15
16
17
18
public void channelRead (ChannelHandlerContext ctx, Object msg) {final Channel child = (Channel)msg;new ChannelHandler []{this .childHandler});this .childOptions, ServerBootstrap.logger);this .childAttrs);try {this .childGroup.register(child).addListener(new ChannelFutureListener () {public void operationComplete (ChannelFuture future) throws Exception {if (!future.isSuccess()) {catch (Throwable var5) {
Netty中解决了Selector的空轮询 大家应该早就听说过臭名昭著的Java NIO epoll的Bug,它会导致Selector空轮询,最终导致CPU使用率达到100%。官方声称JDK 1.6的update18修复了该问题,但是直到JDK 1.7该问题仍旧存在,只不过该Bug发生概率降低了一些而已,并没有被根本解决。出现此Bug是因为当Selector轮询结果为空时,没有进行wakeup或对新消息及时进行处理,导致发生了空轮询,CPU使用率达到了100%。
创建一个新的Selector
将原来Selector中注册的事件全部取消
将可用事件重新注册到新的Selector,并激活。就这样,Netty完美解决了JDK的空轮询Bug
Handler的添加过程 服务端Handler 的添加过程和客户端的有点区别, 跟EventLoopGroup 一样, 服务端的Handler 也有两个: 一个是通过handler()方法设置的Handler,另一个是通过childHandler()方法设置的childHandler:
Handler 与accept 过程有关, 即Handler负责处理客户端新连接接入的请求,Handler只在建立连接时有用
childHandler负责和客户端连接的I/O交互,即建立连接后负责处理网络IO的读写以及业务处理
EventLoop NioEventLoopGroup初始化的过程
基本步骤:
EventLoopGroup ( 其实是MultithreadEventExecutorGroup ) 内部维护一个属性为EventExecutor的children的数组,其大小是nThreads,这样就初始化了一个线程池
我们在实例化NioEventLoopGroup时,如果指定线程池大小,则nThreads就是指定的值,否则是CPU核数×2
在MultithreadEventExecutorGroup中调用newChild()抽象方法来初始化children数组
newChild()抽象方法实际上是在NioEventLoopGroup中实现的,由它返回一个NioEventLoop实例
初始化NioEventLoop对象并给属性赋值,具体赋值的属性如下:
provider : 就是在NioEventLoopGroup 的构造器中, 调用SelectorProvider 的provider() 方法获取的SelectorProvider对象
selector : 就是在NioEventLoop 构造器中, 调用selector=provider.openSelector()方法获取的Selector对象
任务执行者NioEventLoop 我们先来看看NioEventLoop的UML类图:
NioEventLoop 继承自SingleThreadEventLoop , 而SingleThreadEventLoop 又继承自SingleThreadEventExecutor ,而SingleThreadEventExecutor是Netty对本地线程的抽象,它内部有一个Thread属性,实际上就是存储了一个本地Java线程。因此我们可以简单地认为,一个NioEventLoop对象其实就是和一个特定的线程进行绑定,并且在NioEventLoop生命周期内,其绑定的线程都不会再改变。
ChannelPipeline Pipeline注册ChannelHandler 上面我们分析到,在实例化一个Channel时,会伴随着一个ChannelPipeline的实例化,并且此Channel会与这个ChannelPipeline相互关联,这一点可以通过NioSocketChannel的父类AbstractChannel的构造器予以佐证:
1
2
3
4
5
6
7
protected AbstractChannel (Channel parent) {this .parent = parent;this .id = this .newId();this .unsafe = this .newUnsafe();this .pipeline = this .newChannelPipeline();
我们了解到,最开始的时候ChannelPipeline中含有两个ChannelHandlerContext(同时也是ChannelHandler),但是此时的Pipeline并不能实现特定的功能,因为还没有添加自定义的ChannelHandler 。通常来说, 在初始化Bootstrap时,会添加自定义的ChannelHandler,下面就以具体的客户端启动代码片段来举例:
1 2 3 4 5 6 7 8 9 10 11 12 13 14 15 bootstrapnew ChannelInitializer <SocketChannel>() {@Override protected void initChannel (SocketChannel socketChannel) throws Exception {ChannelPipeline p = socketChannel.pipeline();new IdleStateHandler (0 , 0 , 5 ));new LengthFieldBasedFrameDecoder (1024 , 0 , 4 , -4 , 0 ));new ClientHandler (NettyClient.this ));
在主线程里面通过handler()方法添加一个ChannelInitializer到pipeline中
1
2
3
4
5
6
7
8
9
10
11
12
13
14
15
16
17
18
19
20
21
22
23
24
25
26
27
28
29
30
31
32
33
void init (Channel channel) {ChannelPipeline p = channel.pipeline();new ChannelHandler []{this .config.handler()});this .newOptionsArray(), logger);this .newAttributesArray());public final ChannelPipeline addLast (EventExecutorGroup group, String name, ChannelHandler handler) {synchronized (this ) {this .newContext(group, this .filterName(name, handler), handler);private AbstractChannelHandlerContext newContext (EventExecutorGroup group, String name, ChannelHandler handler) {return new DefaultChannelHandlerContext (this , this .childExecutor(group), name, handler);super (pipeline, executor, name, handler.getClass());this .handler = handler;
因为ChannelInitializer仅仅只实现了ChannelInboundHandler 接口,所以ChannelInitializer 所对应的DefaultChannelHandlerContext的inbound=true,outbound=false
接下来我们继续来探讨ChannelInitializer 在哪里被调用、ChannelInitializer 的作用及自定义的ChannelHandler 是如何插入Pipeline中的
1
2
3
4
5
6
7
8
9
10
11
12
13
14
15
16
17
18
19
20
21
22
23
24
25
26
27
28
29
30
31
32
33
34
35
36
37
38
39
40
41
42
43
44
45
46
47
48
49
50
51
52
53
54
55
56
57
58
59
60
public final void register (EventLoop eventLoop, final ChannelPromise promise) {"eventLoop" );if (AbstractChannel.this .isRegistered()) {new IllegalStateException ("registered to an event loop already" ));else if (!AbstractChannel.this .isCompatible(eventLoop)) {new IllegalStateException ("incompatible event loop type: " + eventLoop.getClass().getName()));else {this .eventLoop = eventLoop;if (eventLoop.inEventLoop()) {this .register0(promise);else {private void register0 (ChannelPromise promise) {try {this .pipeline.fireChannelRegistered();catch (Throwable var3) {public final ChannelPipeline fireChannelRegistered () {this .head);return this ;static void invokeChannelRegistered (final AbstractChannelHandlerContext next) {EventExecutor executor = next.executor();if (executor.inEventLoop()) {else {new Runnable () {public void run () {private void invokeChannelRegistered () {if (this .invokeHandler()) {try {this .handler()).channelRegistered(this );catch (Throwable var2) {this .invokeExceptionCaught(var2);else {this .fireChannelRegistered();
我们再接着看ChannelInitializer中的channelRegistered()方法:
1
2
3
4
5
6
7
8
9
10
11
12
13
14
15
16
17
18
19
20
21
22
23
24
25
26
27
28
29
30
public final void channelRegistered (ChannelHandlerContext ctx) throws Exception {if (this .initChannel(ctx)) {this .removeState(ctx);else {private boolean initChannel (ChannelHandlerContext ctx) throws Exception {if (this .initMap.add(ctx)) {try {this .initChannel(ctx.channel());catch (Throwable var8) {finally {if (var7) {ChannelPipeline pipeline = ctx.pipeline();if (pipeline.context(this ) != null ) {this );else {return false ;
Bootstrap中传入的匿名内部类:
1 2 3 4 5 6 7 8 9 10 11 12 13 14 15 16 bootstrapnew ChannelInitializer <SocketChannel>() {@Override protected void initChannel (SocketChannel socketChannel) throws Exception {ChannelPipeline p = socketChannel.pipeline();new IdleStateHandler (0 , 0 , 5 ));new LengthFieldBasedFrameDecoder (1024 , 0 , 4 , -4 , 0 ));new ClientHandler (NettyClient.this ));
Outbound事件为传播过程
Outbound事件是请求事件(由Connect发起一个请求,并最终由Unsafe处理这个请求)
Outbound事件的发起者是Channel
Outbound事件的处理者是Unsafe
Outbound事件在Pipeline中的传输方向是从Tail到Head
在ChannelHandler中处理事件时,如果这个Handler不是最后一个Handler,则需要调用ctx的方法(如ctx.connect()方法)将此事件继续传播下去。如果不这样做,那么此事件的传播会提前终止
Outbound事件的传播方向是,从Context.OUT_EVT()方法到Connect.findContextOutbound() 方法, 再到nextContext.invokeOUT_EVT()方法,再到nextHandler.OUT_EVT()方法,最后到nextContext.OUT_EVT()方法
Inbound事件传播过程
Inbound事件为通知事件,当某件事情已经就绪后,会通知上层
Inbound事件的发起者是Unsafe
Inbound事件的处理者是Channel,如果用户没有实现自定义的处理方法,那么Inbound事件默认的处理者是TailContext,并且其处理方法是空实现
Inbound事件在Pipeline中的传输方向是从Head到Tail
在ChannelHandler中处理事件时,如果这个Handler不是最后一个Handler , 则需要调用ctx.fireIN_EVT() 方法( 如ctx.fireChannelActive()方法)将此事件继续传播下去。如果不这样做,那么此事件的传播会提前终止。
Intbound事件的传播方向是,从Context.fireIN_EVT()方法到Connect.findContextInbound() 方法, 再到nextContext.invokeIN_EVT()方法, 再到nextHandler.IN_EVT() 方法,最后到nextContext.fireIN_EVT()方法
Handler ChannelHandlerContext 每个ChannelHandler被添加到ChannelPipeline后,都会创建一个ChannelHandlerContext , 并与ChannelHandler 关联绑定。ChannelHandlerContext允许ChannelHandler与其他的ChannelHandler进行交互。ChannelHandlerContext不会改变添加到其中的ChannelHandler, 因此它是安全的。
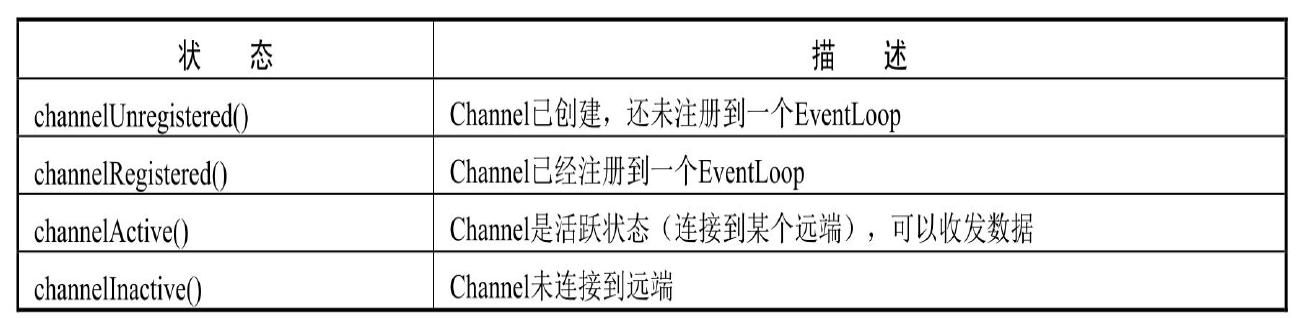
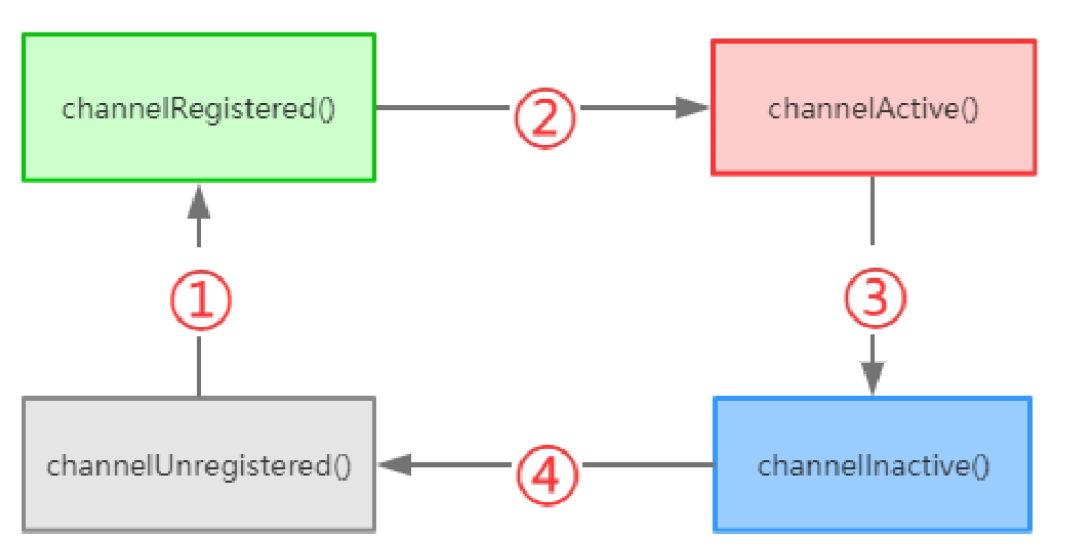
Channel的生命周期
一个Channel正常的生命周期如下图所示,随着状态发生变化产生相应的事件。这些事件被转发到ChannelPipeline中的ChannelHandler来触发相应的操作:
ChannelInboundHandler ChannelInboundHandler提供了一些在接收数据或Channel状态改变时被调用的方法:
Netty 提供了一个实现ChannelInboundHandler 接口并继承ChannelHandlerAdapter 的类: ChannelInboundHandlerAdapter 。ChannelInboundHandlerAdapter实现了ChannelInboundHandler的所有方法,作用就是处理消息并将消息转发到ChannelPipeline中的下一个ChannelHandler,ChannelInboundHandlerAdapter的channelRead()方法处理完消息后不会自动释放消息,若想自动释放收到的消息,可以使用SimpleChannelInboundHandler
Netty中的异步处理 Future Netty扩展了Java的Future,在Future的基础上拓展了监听器(Listener)接口,通过监听器可以让异步执行更加有效率,不需要通过调用get()方法来等待异步执行结束,而是通过监听器回调来精确地控制异步执行结束时间
Promise Promise接口也是Future的扩展接口,它表示一种可写的Future,可以自定义设置异步执行的结果
ByteBuf ByteBuf的基本结构 我们发现ByteBuf有三个非常重要的指针, 分别是:
readerIndex ( 记录读指针的开始位置) ,从0到readerIndex为discardable bytes,表示是无效的
writerIndex(记录写指针的开始位置),从readerIndex到writerIndex为readable bytes,表示可读数据区
capacity(缓冲区的总长度),从writerIndex到capacity为writable bytes,表示这段区间空闲,可以往里面写数据
三者的关系是readerIndex<=writerIndex<=capacity,除了这三个指针,ByteBuf里面其实还有一个指针maxCapacity,它相当于ByteBuf扩容的最大阈值。
ByteBuf的重要API
在Netty中,ByteBuf的大部分功能是在AbstractByteBuf中实现的,最重要的几个属性readerIndex、writerIndex 、markedReaderIndex、markedWriterIndex 、maxCapacity 被定义在AbstractByteBuf抽象类中,如果对其具体的实现感兴趣可以去看看对应的源码。
ByteBuf的基本分类 AbstractByteBuf有众多子类,大致可以从三个维度来进行分类,分别如下:
Pooled:池化内存,就是从预先分配好的内存空间中提取一段连续内存封装成一个ByteBuf,分给应用程序使用
Unsafe:是JDK底层的一个负责I/O操作的对象,可以直接获得对象的内存地址,基于内存地址进行读写操作。
Direct:堆外内存,直接调用JDK的底层API进行物理内存分配,不在JVM的堆内存中,需要手动释放
综上所述,其实ByteBuf共会有六种组合:Pooled(池化内存)和Unpooled(非池化内存);Unsafe和非Unsafe;Heap(堆内内存)和Direct(堆外内存)
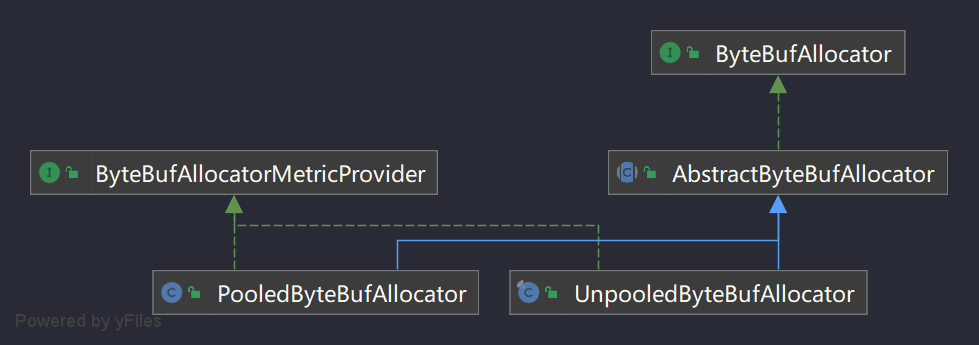
ByteBufAllocator内存管理器 Netty中内存分配有一个顶层的抽象就是ByteBufAllocator,负责分配所有ByteBuf类型的内存。功能其实不是很多,主要有几个重要的API,如下表所示:
ByteBufAllocator的buffer()方法中对是否默认支持directBuffer做了判断,如果支持则分配directBuffer,否则分配heapBuffer,如果操作系统底层支持Unsafe那就采用Unsafe 读写, 否则采用非Unsafe 读写。 ByteBufAllocator有两个实现类,分别用这两个来进行池化/非池化内存分配
Netty的编解码 什么是拆包、粘包? TCP是一个“流”协议。所谓流,就是没有界限的一长串二进制数据。TCP作为传输层协议,并不了解上层业务数据的具体含义,它会根据TCP缓冲区的实际情况进行数据包的划分,所以在业务上认为是一个完整包的,可能会被TCP拆分成多个包进行发送,也有可能把多个小的包封装成一个大的数据包发送,这就是所谓的TCP拆包和粘包问题
由于底层的TCP无法理解上层的业务数据,所以在底层是无法保证数据包不被拆分和重组的,这个问题只能通过上层的应用协议栈设计来解决,主要的解决方式如下:
消息定长,报文长度固定,例如每个报文的长度固定为200字节,如果不够空位补空格
报尾添加特殊分隔符,例如每条报文结束都添加回车换行符(如FTP)或者指定特殊字符作为报文分隔符,接收方通过特殊分隔符区分报文
将消息分为消息头和消息体,消息头包含表示信息的总长度(或者消息体长度)的属性
更复杂的自定义应用层协议
Netty中常用的解码器 ByteToMessageDecoder抽象解码器 使用NIO进行网络编程时,往往需要将读取到的字节数组或者字节缓冲区解码为业务可以使用的POJO 对象( Plain Ordinary JavaObject,普通的Java对象)。因此Netty提供了ByteToMessageDecoder抽象解码类工具。由于ByteToMessageDecoder并没有考虑TCP粘包和拆包等场景,用户自定义解码器需要自己处理“读半包”问题
LineBasedFrameDecoder行解码器 LineBasedFrameDecoder是回车换行解码器,如果用户发送的消息以回车换行符(以\r\n或者直接以\n结尾)作为消息结束的标识,则可以直接使用Netty的LineBasedFrameDecoder对消息进行解码它是以换行符为结束标志的解码器,支持携带结束符或者不携带结束符两种解码方式,同时支持配置单行的最大长度。 如果连续读取到最大长度后仍然没有发现换行符,就会抛出异常,同时忽略之前读到的异常码流,防止由于数据报没有携带换行符导致接收到的ByteBuf无限制积压,引起系统内存溢出
DelimiterBasedFrameDecoder分隔符解码器 DelimiterBasedFrameDecoder分隔符解码器是按照指定分隔符进行解码的解码器,通过分隔符可以将二进制流拆分成完整的数据包。回车换行解码器实际上是一种特殊的DelimiterBasedFrameDecoder解码器
FixedLengthFrameDecoder固定长度解码器 FixedLengthFrameDecoder固定长度解码器能够按照指定的长度对消息进行自动解码,开发者不需要考虑TCP的粘包和拆包等问题,非常实用。
LengthFieldBasedFrameDecoder通用解码器(重点)
1 2 3 4 5 6 7 8 9 10 11 12 public LengthFieldBasedFrameDecoder (int maxFrameLength, int lengthFieldOffset, int lengthFieldLength, int lengthAdjustment, int initialBytesToStrip) {this (maxFrameLength, lengthFieldOffset, lengthFieldLength, lengthAdjustment, initialBytesToStrip, true );
WriteAndFlush事件传播 在实际使用的时候,通常不会调用Channel的write()方法,因为该方法只会写入发送数据的缓存,所以并不会直接写入Channel。如果想写入Channel,还需要调用flush()方法。在实际使用过程中,我们用的更多的是writeAndFlush()方法,这个方法既能将数据写入发送数据的缓存,也能刷新到Channel
MessageToByteEncoder抽象编码器 同解码器一样, 编码器中也有一个抽象类叫MessageToByteEncoder,定义了编码器的骨架方法,具体编码逻辑交给子类实现。解码器同样也是个Handler,将写出的数据进行截取处理。我们知道,写数据的时候会传递write事件,传递过程中会调用Handler的write()方法,所以编码器可以重写write()方法,将数据编码成二进制字节流再传递write事件。
MessageToMessageDecoder抽象解码器 MessageToMessageDecoder实际上是Netty的二次解码器,它的职责是将一个对象二次解码为其他对象
为什么称它为二次解码器呢?我们知道,从SocketChannel读取的TCP数据报是ByteBuf,实际就是字节数组。首先需要将ByteBuf缓冲区中的数据报读取出来,并将其解码为Java对象;然后根据某些规则对Java 对象做二次解码, 将其解码为另一个POJO 对象。因为MessageToMessageDecoder在ByteToMessageDecoder之后,所以称之为二次解码器
事实上,做一个超级复杂的解码器,将多个解码器组合成一个大而全的MessageToMessageDecoder解码器似乎也能解决多次解码的问题,但是采用这种方式的代码可维护性会非常差。例如,如果我们打算在HTTP+XML协议栈中增加一个打印码流的功能,即首次解码获取HttpRequest对象之后打印XML格式的码流。如果采用多个解码器组合,在中间插入一个打印消息体的Handler即可,不需要修改原有的代码;如果做一个大而全的解码器,就需要在解码的方法中增加打印码流的代码,可扩展性和可维护性都会变差。
Netty高性能工具介绍 FastThreadLoacal 前面我们分析过ThreadLocal,我们知道,每个Thread都有一个自己独立的ThreadLocalMap类型的threadLocals属性用来存放线程变量,key为ThreadLocal的弱引用,value为对应的值。
1
2
3
4
5
6
7
8
9
10
11
12
13
14
15
16
17
18
19
20
21
22
23
24
25
26
27
28
29
30
31
32
33
34
35
36
37
38
39
40
41
42
43
44
45
46
47
package cuit.pymjl;import io.netty.util.concurrent.FastThreadLocal;import java.util.concurrent.ArrayBlockingQueue;import java.util.concurrent.ThreadPoolExecutor;import java.util.concurrent.TimeUnit;public class Context {private static FastThreadLocal<String> fastThreadLocal = new FastThreadLocal <>();public static void main (String[] args) {ThreadPoolExecutor threadPoolExecutor = new ThreadPoolExecutor (3 , 3 ,0 , TimeUnit.SECONDS, new ArrayBlockingQueue <>(5 ));try {": pymjl" );finally {try {": 222222" );finally {try {": 333333" );finally {
运行结果:
Recycler对象回收站 Recycler是Netty实现的一个轻量级对象回收站,很多对象在使用完毕之后,并没有直接交给GC去处理,而是通过对象回收站将对象回收,目的是为了对象重用和减少GC压力。比如ByteBuf对象的回收,因为ByteBuf对象在Netty中会被频繁创建,并且占用比较大的内存空间,所以使用完毕后会通过对象回收站的方式进行回收,以达到资源重用的目的